


mooscher
-
Items
24 -
Registratiedatum
-
Laatst bezocht
Inhoudstype
Profielen
Forums
Store
Berichten die geplaatst zijn door mooscher
-
-
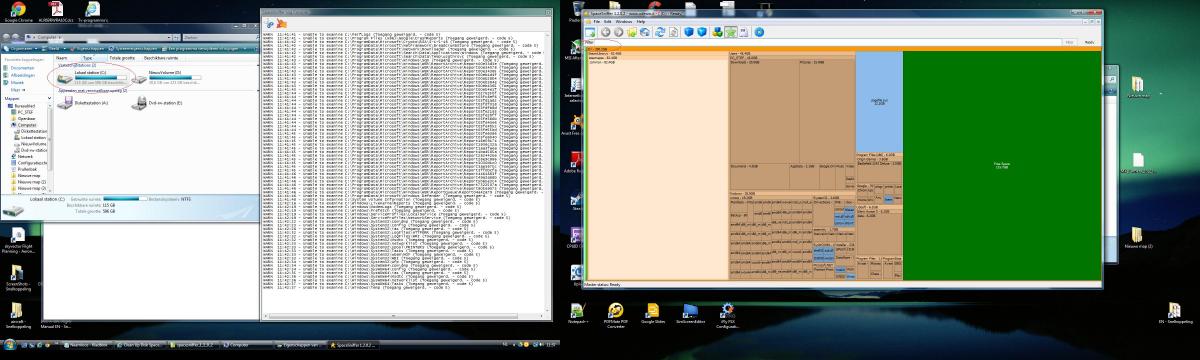
mijn primaire hardisk is altijd zo snel vol terwijl ik er echt niet veel heb op staan .
heb is spacesniffer gedownload omdat ik dat wel interesant vond om te zien , omdat ik het door had van er klopt hier iets niet.
en inderdaad , windows toont 596GB en spacesniffer 300GB totaal .
heb een foto mee geupload met deze post .
zou die stuk zijn die hdd of zijn er mensen met een logishe verklaring of een fix?
danku zeer .

-
ja , zoals op die link je gegeven hebt , maar met nog iets extra , stuurprogramma laden. dus waarom is die optie daar ?( load driver of in nedrlands stuurprogramma laden). volgens mijn moederbord moest ik daar ook op klikken en de nodige dingen doen .
-
in het instalatie menu ( where do you want to instal windows , waar je op de knop format kunt klikken , als je links kijkt zie je een link die zegt Load drivers , en deze optie moest ik uitvoeren volgens mijn moederbord manual. en die drivers dienen om vista juist te instaleren bv enkele hard disk en type en ook of je pc in raid gaat zetten of niet , nu de naam vand die drivers zijn heel moeilijk om uit te maken welke de juiste was voor mijn pc setup,door de foto in mijn manual en omdat ze over zo moet je het doen als je 1 hard disk hebt, kon ik zien welke ik moest nemen , ik zoek iemand die mij meer uitleg kan geven over dit gedeelte , load driver voor dat je vista instaleert.
-
mijn vista is oem versie , ik wou vista herstellen maar dat ging niet , dus die manier zoals in de handleiding zou bij mij niet werken op mijn udr3 x58 moederbord. deze topic gaat over de drivers die je kunt of moet laden nadat je format hebt geklikt. dus het verwisselen van schijf van vista schijf naar moederbord schijf en dan terug vista schijf om de instalatie te voltooien.
nu mijn INF drivers updaten vind ik zo riskant na al die miserie dat ik dat later wil proberen. ik wil met deze topic ,meer info vinden over die drivers die ja eerst moet laden voor dat je vista verder instaleert .
-
Google Vertaling kijk is of die link werkt , het staat waarschijnlijk op 0 en het moet 2 zijn.
---------- Post toegevoegd om 14:41 ---------- Vorige post was om 14:36 ----------
oftewel , ctrl alt del is indrukken als numlock aanstaat en dan afmelden , dit zou de numlock setting opslaan .
-
zal ik doen , hier alvast een speccy link , danku.
-
-
ja, dit heb ik ook geupdate.
-
deze drivers vind je meestal ook op de cd van je moederbord .
-
bij mij valt de numlock ook uit maar na een tijdje is de numlock terug, als ik mij afmeld om naar een andere gebruiker te gaan. misschien is eventjes wachten ?
-
ik heb paar maanden geleden mijn vista hergeinstaleerd en ik heb op de knop formateren geklikt endaarna mijn moederbord cd er ingestoken en op stuurprogrammas laden geklikt , ik kreeg geneen compatibele dinges om aan te klikken en heb dan op toon alle geklikt en heb ik een uit die lijst gekozen die op de foto voorbeeld stond van mijn moederbord handleiding, een die kiest voor 1 enkele hard disk de Intel® ICH8R/ICH9R/ICH10R/DO
of zoiets , heeft er iemand meer info over deze fase omdat ik wel tien opties had , het enigste wat ik weet is dat dit iets te maken had dat mijn pc in raid ging staan of niet.
-
download de manual pdf van je moederbord , echt een aanrader , daar staat hoe je je bios paswoord reset.
-
ik had een virus , waarbij ik mij hd geformateerd heb en vista geherinstaleerd , na 5 of 10 keer heropstarten om de updates van vista te doen , toen had ik het eerst , waarbij ik kies windows opstarten met de laatst bekende configuratie , waarbij het probleem opgelost is voor de ongeveer volgende 30 keer heropstarten. de eerste keer was de IRQL de andere zijn apc index match. dit moet toch een herkent probleem zijn denk ik. ik vind een hotfix op microsoft website , maar ze zeggen dat die al in de updates zit , maar ze spreken niet over die IRQL. IRQL 0x0000000a en APC 0x00000001 bug code . ntoskrnl.exe driver , IRQL adress fout ntoskrnl.exe+55410 en APC adress fout ntoskrnl.exe+5a490.
-
ram disk plus is nog sneller , veel sneller dan ssd . tjah 99 euro voor ram disk plus, tjah. ik denk toch met ram disk dat je halucinerende prestaties meemaakt met gamen , maar ja twas dat je 8 gig hebt en je hebt 4.250 gig waarmee je iets kan doen maar het kost 100 euro. ok
-
hela, je kan van de ram die je te veel hebt een ramdisk maken , echt super goed voor zware spellen zoals flightsim of apb reloaded. RamDisk - Microsoft Certified Software echt 100 keer sneller dan een hard disk. ram disk plus
-
dit zijn de crash dumps van mijn blauwe schermen die ik gehad heb.
alleen bij het opstarten van mijn pc , dan heb ik die blauwe schermen, zoals je ziet , zeer weining maar toch heb ik ze. ik schakel iedere dag mijn pc aan en s avonds uit.
iemand die wat kennis heeft op dat gebied aub? iemand die dit herkend? danku zeer.
http://img690.imageshack.us/img690/5062/bsodrandom.jpg
als je op de link klikt dan zie je de foto klein , je moet nog eens op de foto klikken dan ze je ze groot en leesbaar.
-
ik hoop alles ok gaat , kheb altijd angstaanvallen dat mijn pc weer een soep word en nie opstart. maar ik wil het beste r uit halen zo dus maar proberen hé. het is die Intel r 82801 pci bridge 244e die echt oud is 21-6-2006.
-
wat als het omgekeert is , ik had alle drivers die een geel waarschuwinkje in apparaat beheer manueel bijgewerkt met dat hij moest zoeken op mijn moederbord cd , na wat windows updaten heb ik de autorun van die cd laten draaien en de chipsets geinstalleerd. dus na die nieuwe setup moet ik mijn gpu en audio en lan drivers herinstaleren?
-
ik heb een ga ex58 udr3r moederbord , heb onlang een virus gehad en met het te verwijderen was mijn pc stuk , normaal doet de winkel dat het herstellen maar de winkel is 130 km van waar ik hem gekocht heb en ik heb hem al 2.5 jaar . en ook kost 60 euro voor instaleren van os en 30 euro voor updaten van drivers en twee weken wachten en vervoer met de trein en bus enzo. dus heb ik het maar zelf gedaan zoals in de moederbord handleiding uitgelegd.
nu alle drivers en vista is voledig geinstaleerd , op de website van gigabyte heb ik de nieuwste drivers voor mijn moederbord gedownload , de audio lan en chipsets drivers en nog ene its met storage.
de audio driver was een makkie ,
maar de chipsets ,??? ik krijg een map die INFUpdate noemt???
heeft er iemand al is chipsets drivers geupdate met een setup , omdat ik daar op niet durf klikken omdat er een hele uitleg is bij de readme
de help file
Help for Setup Command-Line Options
    -?   displays this help dialog
    -a   extracts all driver files
    -aonly  extracts driver files that match the system hardware
    -b   reboots the system after setup is complete
    -f2 <path>  changes the default log path
    -l <number>  specifies the language of the setup dialogs
    -nowel  does not display the welcome dialog
    -nolic  does not display the license agreement dialog
    -noread  does not display the readme dialog
    -overide  overwrites the IDE driver
    -overall  overwrites all drivers
    -overwrite  ignores the overwrite warning
    -p <path>  changes the default install path
    -s   does not display any setup dialogs
de readme
************************************************************ * Product: Intel(R) Chipset Device Software * Release: Beta * Version: 9.1.2.1007 * Target Chipset#: Jasper Forest * Date: March 02 2010 ************************************************************ NOTE: For the list of supported chipsets, please refer to the Release Notes ************************************************************ * CONTENTS OF THIS DOCUMENT ************************************************************ This document contains the following sections: 1. Overview 2. System Requirements 3. Contents of the Distribution Package 4. List of Available Command Line Flag Options 5. Contents of the Extracted Files 6. Installing the Software in Interactive Mode 7. Installing the Software in Silent Mode 8. Installing the INF Files Prior to OS Installation 8A. Installing the Windows* 2000 INF Files Prior to OS Installation 8B. Installing the Windows* XP INF Files Prior to OS Installation 8C. Installing the Windows Server* 2003 INF Files Prior to OS Installation 8D. Installing the Windows* Vista INF Files Prior to OS Installation 8E. Installing the Windows Server* 2008 INF files Prior to OS Installation 8F. Installing the Windows Server* 2008 R2 INF files Prior to OS Installation 8G. Installing the Windows 7 INF files Prior to OS Installation 9. Installing the INF Files After OS Installation 9A. Installing the Windows* 2000 INF Files After OS Installation 9B. Installing the Windows* XP INF Files After OS Installation 9C. Installing the Windows Server* 2003 INF Files After OS Installation 9D. Installing the WINDOWS VISTA INF FILES AFTER OS Installation 9E. Installing the Windows Server* 2008 INF FILES AFTER OS Installation 9F. Installing the Windows Server* 2008 R2 INF FILES After OS Installation 9G. Installing the Windows 7 INF FILES AFTER OS Installation 10. Verifying Installation of the Software and Identifying the Software Version Number 11. Troubleshooting ************************************************************ * 1. OVERVIEW ************************************************************ The Intel(R) Chipset Device Software installs Windows* INF files to the target system. These files outline to the operating system how to configure the Intel(R) chipset components in order to ensure that the following features function properly: - Core PCI and ISAPNP Services - PCIe Support - IDE/ATA33/ATA66/ATA100 Storage Support - SATA Storage Support - USB Support - Identification of Intel(R) Chipset Components in the Device Manager This software can be installed in three modes: Interactive, Silent and Unattended Preload. Interactive Mode requires user input during installation; Silent Mode and Unattended Preload do not. This software also offers a set of command line flags, which provide additional installation choices. The command line flags are not case sensitive. Refer to Section 4 for detailed descriptions of these flags. Important Note: The Intel(R) Chipset Device Software is distributed in two formats: self extracting .EXE files (INFINST_AUTOL.EXE) or compressed .ZIP files (INFINST_AUTOL.ZIP). Depending on which distribution format is being executed, the commandline syntax may differ. Refer to Section 4 for more details. ************************************************************ * 2. SYSTEM REQUIREMENTS ************************************************************ 1. Please refer to the Release Notes to view the list of chipsets that the software included with this distribution package is designed to operate with. 2. One of the following operating systems must be fully installed and running on the system before installing this software: Microsoft Windows* Server 2003 Microsoft Windows Server 2003 x64 Edition* Microsoft Windows Server 2008 Microsoft Windows Server 2008 x64 Microsoft Windows XP Microsoft Windows XP Professional x64 Microsoft Windows 2000 Microsoft Windows Vista Microsoft Windows Vista x64 Microsoft Windows 7 Microsoft Windows 7 x64 Microsoft Windows 2008 R2 Microsoft Windows 2008 R2 x64 This software is designed for the latest Service packs releases of above operating systems. To verify which operating system has been installed onto the target system, follow the steps below: a. Click on Start. b. Select Settings. c. Select Control Panel. d. Double-click on the System icon. e. Click on the General system properties tab. f. Verify which OS has been installed by reading the System information. 3. It is recommended that the software be installed on systems with at least 64MB of system memory when using Windows* 2000, Windows* XP, Windows Server* 2003, Windows Server* 2008, and Windows* Vista. 4. It is recommended that there be a minimum of 5MB of hard disk space on the system in order to install this software. 5. The operating system must be fully installed and running on the system before running this software. 6. Close any running applications to avoid installation problems. 7. It is recommended that the Intel(R) Chipset Device Software be installed onto the target system prior to the installation of other drivers. Please check with the system provider to determine which operating system and Intel(R) chipset are used in the system. ************************************************************ * 3. CONTENTS OF THE DISTRIBUTION PACKAGE ************************************************************ The Intel(R) Chipset Device Software package contains the following items: File(s) ------- INFINST_AUTOL.EXE -or- INFINST_AUTOL.ZIP README.TXT, RELEASE_xxx.HTM *** NOTE: Only the files that reference the currently detected devices are copied to the system. If the -A option is exercised, the files are not copied to the <Windows>\INF directory. Refer to Section 4 for more information. ************************************************************ * 4. LIST OF AVAILABLE COMMAND LINE FLAG OPTIONS ************************************************************ The Intel(R) Chipset Device Software supports several command line flags for various installation options. Below is a list of all the available command line flags that may be used with the program call. Note that the '-L' and the '-S' flags MUST be specified at the end of the command line flag list. Flag Description ---- ----------- -? Displays the list of available command line flags. This flag works in Interactive Mode only. -A Extracts the INF files and Readme to either "C:\Program Files\Intel\InfInst" or the <Installation Path> directory specified using the '-P' flag. The software will NOT install these INF files to the system. This flag can be combined only with the '-P' flag. All other options will be ignored if the '-A' flag is specified. This flag works in Interactive Mode only. -AONLY Extracts the needed INF files to install on the current system. If the install has been run once successfully, '-AONLY' will not return any INFs when used in conjunction with '-OVERALL' switch, all the needed INFs for the system will be extracted. -B Automatically reboots the system after installation. This flag is ignored if '-A' flag is specified. This flag works in either Silent Mode or Interactive Mode. -F2 <path\filename> Specifies an alternate location and name of the log file created by InstallShield Silent. This option is used for silent installation from a CD. 'Path' indicates the directory path where installation status is logged in file 'filename'. -L <number> Specifies the language of the setup dialogs. This flag works in Interactive Mode only. -OVERALL Updates ALL INF drivers on all available devices even if third party drivers are currently installed. This flag works in Interactive Mode only. -OVERIDE Updates the storage drivers even if a third party storage driver is currently installed. This flag works in Interactive Mode only. -OVERWRITE Ignores the overwrite warning dialog when installing an older version of the software. -P<Installation Path> Specifies the hard disk location to which the INF program files are copied. If this flag is not specified at the command line, the <Installation Path> directory is as follows: C:\Program Files\Intel\INFInst If this flag is used without the '-A' option, only the Readme will be copied to <Installation Path>. The directory name can include spaces, but then a pair of double quotes (") must enclose the directory name. There should not be any space between the switch '-p' and the directory name. This flag works in either Silent Mode or Interactive Mode. -S Runs the Installer in Silent Mode (no user interface is displayed). This flag and the '-L' flag must be placed at the end of the command line flag list. Below are the language codes used with the '-L' flag: <number> Language -------- ---------- 0401 Arabic (International) 0804 Chinese (Simplified) 0404 Chinese (Traditional) 0405 Czech 0406 Danish 0413 Dutch 0409 English (United States) 040B Finnish 040C French (International) 0407 German 0408 Greek 040D Hebrew 040E Hungarian 0410 Italian 0411 Japanese 0412 Korean 0414 Norwegian 0415 Polish 0416 Portuguese (Brazil) 0816 Portuguese (Standard) 0419 Russian 040A Spanish (International) 041D Swedish 041E Thai 041F Turkish ************************************************************ * 5. CONTENTS OF THE EXTRACTED FILES ************************************************************ INF files are copied to the hard disk after running the Intel(R) Chipset Device Software executable with an '-A' flag (i.e., "INFINST_AUTOL.EXE -A" or "SETUP.EXE -A"). The location of the INF files depends on whether a '-P' flag is specified along with the '-A' flag: 1. If a '-P' flag is not specified, then the INF files are copied to the following directory: "C:\Program Files\Intel\INFINST" 2. If a '-P' flag is specified, then the INF files are copied to the location listed immediately after the '-P' flag. Refer to Section 4 for more information on flag usage. After INF file extraction, the INF files and components are copied to the <INF Extract Directory>. These files and components are categorized according to the operating system. The following table summarizes the locations of the INF files by operating system: NOTE: "<INF Extract Directory>" is abbreviated "<IED>" in the remainder of this section. The directories are classified according to the following: All\ Contains INF files designed for Windows* 2000, Windows* XP, Windows Server* 2003, Windows Server* 2008, and Windows* Vista Win7\ Contains INF files designed for Windows* 7 and Windows Server* 2008 R2 NOTE: INFAnswr.TXT makes a CUSTOM.INF template that installs the INF files for Intel(R) chipsets during operating system setup. OEMs can incorporate this file into the Setup directory for the OEM Preload Kit. (Refer to Section 8 for more details.) ************************************************************ * 6. INSTALLING THE SOFTWARE IN INTERACTIVE MODE ************************************************************ 1. Verify that all system requirements have been met as described in Section 2 above. 2. Run the InstallShield* installation program: Self-extracting .EXE distribution: INFINST_AUTOL.EXE Compressed .ZIP distribution: SETUP.EXE 3. You will be prompted to agree to the license agreement. If you do not agree, the installation program will exit before extracting any files. 4. Once the operating system reboots, follow the on-screen instructions and accept default settings to complete the setup. ************************************************************ * 7. INSTALLING THE SOFTWARE IN SILENT MODE ************************************************************ 1. Verify that all system requirements have been met as described in section 2. 2. Run the InstallShield* installation program: For silent install with auto-reboot: Self-extracting .EXE distribution: INFINST_AUTOL.EXE -b -s Compressed .ZIP distribution: SETUP.EXE -b -s - or - For silent install without auto-reboot: Self-extracting .EXE distribution: INFINST_AUTOL.EXE -s Compressed .ZIP distribution: SETUP.EXE -s 3. The utility will perform the necessary updates and record the installation status in the following system registry key: HKEY_LOCAL_MACHINE\Software\Intel\INFInst 4. If the utility was invoked with the "-b" flag, the system will automatically reboot if the update was successful. NOTE: The system MUST be rebooted for all device updates to take effect. 5. To determine whether the install was successful, verify the "install" value in the registry key specified in Step 3. 6. In Silent Mode the utility will not display the license agreement. When using Silent Mode the license agreement, license.txt, will be placed in the following folder: Program Files/Intel/INFInst folder. Please read this agreement. The following describes the various parameters: Name: "install" Type: String Data: "success" The installation was successful. Data: "fail" The installation was not successful. No INF files were copied to the system. Name: "reboot" Type: String Data: "Yes" A reboot is required to complete the installation. Data: "No" No reboot is required to complete the installation. Name: "version" Type: String Data: <varies> Current version number of the Intel(R) Chipset Device Software ************************************************************ * 8. INSTALLING THE INF FILES PRIOR TO OS INSTALLATION ************************************************************ This procedure requires a minimum of 5MB of hard disk space. It is important to make sure there is enough disk space before beginning the copy process. Copy the operating system installation files from the setup directory to a directory on the hard disk. This can be done by opening 'My Computer', right-clicking on the correct drive, and selecting 'Properties'. The directories shall be referred to as follows: Windows* 2000 : <WIN2000 Setup Directory> Windows XP : <WINXP Setup Directory> Windows Server* 2003 : <WIN2003 Setup Directory> ************************************************************ * 8A. INSTALLING THE WINDOWS* 2000 INF FILES PRIOR TO * OS INSTALLATION ************************************************************ NOTE: The Windows* 2000 OEM Preload Kit distribution CD contains a setup directory with all the base operating system setup files and installation programs (WINNT.EXE and WINNT32.EXE). The name of the directory may vary depending on the distribution CD (e.g., \I386\). 1. Create the following directory structure under the <WIN2000 Setup Directory>: \$OEM$\$$\INF 2. Copy the Windows* 2000 INF files from <INF Extract Directory>\XXXX\All to the directory created in Step 1 above: <WIN2000 Setup Directory>\$OEM$\$$\INF NOTE: XXXX is the directory name for the chipset of interest. Refer to Section 8 for more details. 3. Create the following directory structure under the <WIN2000 Setup Directory>: \$OEM$\$1\drivers\IntelINF 4. Copy the Windows* 2000 INF files and the catalog files (.CAT) from <INF Extract Directory>\XXXX\All to the directory created in Step 4 above: <WIN2000 Setup Directory>\$OEM$\$1\drivers\IntelINF NOTE: XXXX is the directory name for the chipset of interest. Refer to Section 8 for more details. 5. Either modify the default Windows* 2000 installation answer file, UNATTEND.TXT, located in <All Setup Directory>, or create a customized answer file. The answer file must include the following information: [unattended] OemPreinstall = Yes OemPnPDriversPath="drivers\IntelINF" A sample answer file for preloading the Intel(R) Chipset Device Software files is available at: <INF Extract Directory>\XXXX\All\INFAnswr.TXT For more information about Windows* 2000 answer files and unattended installations, please refer to the Microsoft* Windows* 2000 Guide to Unattended Setup. If you are a computer manufacturer, refer to the Microsoft Windows* 2000 OEM Preinstallation Kit (OPK) User Guide for more information about the \$OEM$ folder. Otherwise, refer to the Microsoft Windows* 2000 Deployment Guide. 6. Run "WINNT.EXE /u:<answer file name> /s:<WIN2000 Setup Directory>" to install Windows* 2000. ************************************************************ * 8B. INSTALLING THE WINDOWS* XP INF FILES PRIOR TO * OS INSTALLATION ************************************************************ NOTE: The Windows* XP OEM Preload Kit distribution CD contains a setup directory with all the base operating system setup files and installation programs (WINNT.EXE and WINNT32.EXE). The name of the directory may vary depending on the distribution CD (e.g., \I386\). 1. Create the following directory structure under the <WINXP Setup Directory>: \$OEM$\$$\INF 2. Copy the Windows* XP INF files from <INF Extract Directory>\XXXX\All to the directory created in Step 1 above: <WINXP Setup Directory>\$OEM$\$$\INF NOTE: XXXX is the directory name for the chipset of interest. Refer to Section 8 for more details. 3. Create the following directory structure under the <WINXP Setup Directory>: \$OEM$\$1\drivers\IntelINF 4. Copy the Windows* XP INF files AND the catalog files (.CAT) from <INF Extract Directory>\XXXX\All to the directory created in Step 4 above: <WINXP Setup Directory>\$OEM$\$1\drivers\IntelINF NOTE: XXXX is the directory name for the chipset of interest. Refer to Section 8 for more details. 5. Either modify the default Windows* XP installation answer file, UNATTEND.TXT, located in <WINXP Setup Directory>, or create a customized answer file. The answer file must include the following information: [unattended] OemPreinstall = Yes OemPnPDriversPath="drivers\IntelINF" A sample answer file for preloading the Intel(R) Chipset Device Software files is available: <INF Extract Directory>\XXXX\All\INFAnswr.TXT If you are a computer manufacturer, refer to the Microsoft* Windows* XP Guide to Unattended Setup for more information about Windows* XP answer files and unattended installations. For more information about the \$OEM$ folder, refer to the Microsoft Windows* XP OEM Preinstallation Kit (OPK) User Guide. If you are not a manufacturer, refer to the Microsoft Windows* XP Deployment Guide. 6. Run "WINNT.EXE /u:<answer file name> /s:<WINXP Setup Directory>" to install Windows* XP. ************************************************************ * 8C. INSTALLING THE WINDOWS SERVER* 2003 INF FILES PRIOR * TO OS INSTALLATION ************************************************************ NOTE: The Windows Server* 2003 OEM Preload Kit distribution CD contains a setup directory with all the base operating system setup files and installation programs (WINNT.EXE and WINNT32.EXE). The name of the directory may vary depending on the distribution CD (e.g., \I386\). 1. Create the following directory structure under the <WIN2003 Setup Directory>: \$OEM$\$$\INF 2. Copy the Windows Server* 2003 INF files from <INF Extract Directory>\XXXX\All to the directory created in Step 1 above: <WIN2003 Setup Directory>\$OEM$\$$\INF NOTE: XXXX is the directory name for the chipset of interest. Refer to Section 8 for more details. 3. Create the following directory structure under the <WIN2003 Setup Directory>: \$OEM$\$1\drivers\IntelINF 4. Copy the Windows Server* 2003 INF files and the catalog files (.CAT) from <INF Extract Directory>\XXXX\All to the directory created in Step 3 above: <WIN2003 Setup Directory>\$OEM$\$1\drivers\IntelINF NOTE: XXXX is the directory name for the chipset of interest. Refer to Section 8 for more details. 5. Either modify the default Windows Server* 2003 installation answer file, UNATTEND.TXT, located in <WIN2000 Setup Directory>, or create a customized answer file. The answer file must include the following information: [unattended] OemPreinstall = Yes OemPnPDriversPath="drivers\IntelINF" A sample answer file for preloading the Intel(R) Chipset Device Software files is available: <INF Extract Directory>\XXXX\All\INFAnswr.TXT For more information about Windows Server* 2003 answer files and unattended installations, please refer to the Microsoft Windows Server* 2003 Guide to Unattended Setup. If you are a computer manufacturer, refer to the Microsoft Windows Server* 2003 OEM Preinstallation Kit (OPK) User Guide for more information about the \$OEM$ folder. Otherwise, refer to the Microsoft Windows Server* 2003 Deployment Guide. 6. Run "WINNT.EXE /u:<answer file name> /s:<WIN2003 Setup Directory>" to install Windows* 2000. ************************************************************ * 8D. INSTALLING THE WINDOWS* VISTA INF FILES PRIOR * TO OS INSTALLATION ************************************************************ NOTE: Although $OEM$ method is still supported, it is no longer the preferred method. Microsoft* published a Wndows Automated Installation Kit(WAIK) which facilitates creation of answer files and image creation for unattended installs of Windows Vista To add drivers to an offline Windows image 1. Locate the device driver .inf files that you intend to install on your Windows image. 2. Use Windows System Image Manager (Windows SIM) to create an answer file that contains the paths to the device drivers that you intend to install. 3. Add the Microsoft-Windows-PnpCustomizationsNonWinPE component to your answer file in the offlineServicing pass. 4. Expand the Microsoft-Windows-PnpCustomizationsNonWinPE node in the answer file. Right-click DevicePaths, and then select Insert New PathAndCredentials. 5. In the Microsoft-Windows-PnpCustomizationsNonWinPE component, specify the path to the device driver and the credentials used to access the file if the file is on a network share. 6. Save the answer file and exit Windows SIM. The answer file must be similar to the following sample. <?xml version="1.0" ?> <unattend xmlns="urn:schemas-microsoft-com:asm.v3" xmlns:wcm="[url="http://schemas.microsoft.com/WMIConfig/2002/State"]Error[/url]"> <settings pass="offlineServicing"> <component name="Microsoft-Windows-PnpCustomizationsNonWinPE" processorArchitecture="x86" publicKeyToken="31bf3856ad364e35" language="neutral" versionScope="nonSxS"> <DriverPaths> <PathAndCredentials wcm:keyValue="1"> <Path>\\networkshare\share\drivers</Path> <Credentials> <Domain>Fabrikam</Domain> <Username>MyUserName</Username> <Password>MyPassword</Password> </Credentials> </PathAndCredentials> </DriverPaths> </component> </settings> </unattend> 7. Mount the Windows image that you intend to install the drivers to by using ImageX. For example: imagex /mountrw C:\windows_distribution\sources\install.wim 1 C:\wim_mount 8. Enable logging of specific device driver injection actions in a separate log file. Edit the following registry key on the computer on which you are running Package Manager: Path: HKLM\Software\Microsoft\Windows\CurrentVersion\Device Installer Key: DebugPkgMgr Type: REG_DWORD Value: 0x01 This will create a Drivers.log file during the driver package injection. This log file will log all actions of the driver injection process. 9. Use Package Manager to apply the unattended installation answer file to the mounted Windows image. Specify a location for the log file to create. For example, pkgmgr /o:"C:\wim_mount\;C:\wim_mount\Windows" /n:"C:\unattend.xml" /l:"C:\pkgmgrlogs\logfile.txt" For more information about using Package Manager, see Package Manager Command-Line Options. The .inf files referenced in the path in the answer file are added to the Windows image. A log file is created in the directory C:\Pkgmgrlogs\. Driver log files are created in the directory that PkgMgr runs from. You can open the Drivers.log file and review the Package Manager driver injection actions. 10. Review the contents of the %WINDIR%\Inf\ directory in the mounted Windows image to ensure that the .inf files were installed. Drivers added to the Windows image are named oem*.inf. This is to ensure unique naming for new drivers added to the computer. For example, the files MyDriver1.inf and MyDriver2.inf are renamed oem0.inf and oem1.inf. 11. Unmount the .wim file and commit the changes. For example, imagex /unmount /commit C:\wim_mount 12. The Windows image is ready to be deployed. For more information about Windows Vista answer files and unattended installations, please refer to the Windows Automated Installation Kit (WAIK) User's Guide. ************************************************************ * 8E. INSTALLING THE WINDOWS SERVER* 2008 INF FILES PRIOR * TO OS INSTALLATION ************************************************************ NOTE: Although $OEM$ method is still supported, it is no longer the preferred method. Microsoft* published a Wndows Automated Installation Kit(WAIK) which facilitates creation of answer files and image creation for unattended installs of Windows Server 2008 To add drivers to an offline Windows image 1. Locate the device driver .inf files that you intend to install on your Windows image. 2. Use Windows System Image Manager (Windows SIM) to create an answer file that contains the paths to the device drivers that you intend to install. 3. Add the Microsoft-Windows-PnpCustomizationsNonWinPE component to your answer file in the offlineServicing pass. 4. Expand the Microsoft-Windows-PnpCustomizationsNonWinPE node in the answer file. Right-click DevicePaths, and then select Insert New PathAndCredentials. 5. In the Microsoft-Windows-PnpCustomizationsNonWinPE component, specify the path to the device driver and the credentials used to access the file if the file is on a network share. 6. Save the answer file and exit Windows SIM. The answer file must be similar to the following sample. <?xml version="1.0" ?> <unattend xmlns="urn:schemas-microsoft-com:asm.v3" xmlns:wcm="[url="http://schemas.microsoft.com/WMIConfig/2002/State"]Error[/url]"> <settings pass="offlineServicing"> <component name="Microsoft-Windows-PnpCustomizationsNonWinPE" processorArchitecture="x86" publicKeyToken="31bf3856ad364e35" language="neutral" versionScope="nonSxS"> <DriverPaths> <PathAndCredentials wcm:keyValue="1"> <Path>\\networkshare\share\drivers</Path> <Credentials> <Domain>Fabrikam</Domain> <Username>MyUserName</Username> <Password>MyPassword</Password> </Credentials> </PathAndCredentials> </DriverPaths> </component> </settings> </unattend> 7. Mount the Windows image that you intend to install the drivers to by using ImageX. For example: imagex /mountrw C:\windows_distribution\sources\install.wim 1 C:\wim_mount 8. Enable logging of specific device driver injection actions in a separate log file. Edit the following registry key on the computer on which you are running Package Manager: Path: HKLM\Software\Microsoft\Windows\CurrentVersion\Device Installer Key: DebugPkgMgr Type: REG_DWORD Value: 0x01 This will create a Drivers.log file during the driver package injection. This log file will log all actions of the driver injection process. 9. Use Package Manager to apply the unattended installation answer file to the mounted Windows image. Specify a location for the log file to create. For example, pkgmgr /o:"C:\wim_mount\;C:\wim_mount\Windows" /n:"C:\unattend.xml" /l:"C:\pkgmgrlogs\logfile.txt" For more information about using Package Manager, see Package Manager Command-Line Options. The .inf files referenced in the path in the answer file are added to the Windows image. A log file is created in the directory C:\Pkgmgrlogs\. Driver log files are created in the directory that PkgMgr runs from. You can open the Drivers.log file and review the Package Manager driver injection actions. 10. Review the contents of the %WINDIR%\Inf\ directory in the mounted Windows image to ensure that the .inf files were installed. Drivers added to the Windows image are named oem*.inf. This is to ensure unique naming for new drivers added to the computer. For example, the files MyDriver1.inf and MyDriver2.inf are renamed oem0.inf and oem1.inf. 11. Unmount the .wim file and commit the changes. For example, imagex /unmount /commit C:\wim_mount 12. The Windows image is ready to be deployed. For more information about Windows Server 2008 answer files and unattended installations, please refer to the Windows Automated Installation Kit (WAIK) User's Guide. ************************************************************ * 8F. INSTALLING THE WINDOWS 7* INF FILES PRIOR * TO OS INSTALLATION ************************************************************ The simplest method for installing Windows? onto new hardware is to start directly from the Windows product DVD with an answer file called Autounattend.xml. Boot the computer with the Windows Setup media in the DVD drive and the configuration set available on an external drive. By default, Windows Setup searches all removable media for an answer file called Autounattend.xml. Autounattend.xml must be located at the root of the removable media. The answer file enables you to automate all or parts of Windows Setup Includeing adding INF files. You can create an answer file by using Windows System Image Manager (Windows SIM). Microsoft* published a Wndows Automated Installation Kit(WAIK) (Must be the windows 7 version) which facilitates creation of answer files and image creation for unattended installs of Windows 7 with tools such as Windows SIM To create a configuration set you will need: Windows System Image Manager (Windows SIM) installed on a technician computer. An authorized copy of a Windows Vista? product DVD. Chipset device driver .inf files. Access to a network share or removable media with sufficient storage space. 1. Create a New Answer File (In this step, you define basic disk configuration and other settings that are required for an unattended installation.) A. On your technician computer, insert the Windows 7 product DVD into the local DVD-ROM drive. B. On the desktop of the technician computer, navigate to the \Sources directory on your DVD-ROM drive. Copy the Install.wim file from the Windows product DVD to a location on the computer. C. Open Windows SIM. On the desktop of the computer, click Start, point to Programs, point to Microsoft Windows OPK (or Windows AIK), and then click Windows System Image Manager. D. On the File menu, click Select Windows Image. E. In the Select a Windows Image dialog box, navigate to the location where you saved the Install.wim file, and then click Open. Note: A warning will appear that a .clg file does not exist. Click OK to create a .clg file. If there is more than one Windows image in the .wim file, you are prompted to select the Windows image to open. F. On the File menu, click New Answer File. 2. Create a Distribution Share (In this step, you create a distribution-share folder on your technician computer. The distribution share will store out-of-box drivers, applications, and any resource files needed for your custom installation.) A. In Windows SIM, in the Distribution Share pane, click Select a Distribution Share. B. Right-click to select Create Distribution Share. C. The Create a Distribution Share dialog box appears. D. Click New Folder, and then type a name for the folder. For example "C:\MyDistributionShareClick" E. In the Distribution Share pane, the distribution share folder opens. Windows SIM automatically creates the following folder structure. C:\MyDistributionShare\$OEM$ Folders C:\MyDistributionShare\Packages C:\MyDistributionShare\Out-of-Box 3. Add Drivers and Applications to Distribution Share A. In Windows SIM, on the Tools menu, select Explore Distribution Share. B. The Distribution Share window opens. C. Copy your device driver files (.inf) to the Out-of-Box Drivers folder. 1. Create subdirectories for each driver. For example, create directories "Chipset" and "Video" in the Out-of-Box Drivers folder. D. Close the distribution share folder. 4. Add a Device Driver to the Answer File (In this step, you add an out-of-box drivers (.inf) path to your answer file.) A. In Windows SIM, on the Insert menu, click Driver Path, and then click Pass 1 windowsPE. B. The Browse for Folder dialog box appears. C. Select the driver path to add to the answer file, and then click OK. For example, "C:\MyDistributionShare\Out-of-Box Drivers\Chipset" 5. Validate the Answer File (In this step, you validate the settings in your answer file and then save them to a file.) A. In Windows SIM, click Tools, and then click Validate Answer File. B. If the answer file validates successfully, a "success" message appears in the Messages pane; otherwise, error messages appear in the same location. C. If an error occurs, in the Messages pane, double-click the error to navigate to the incorrect setting. Change the setting to fix the error, and then revalidate the answer file. D. On the File menu, click Save Answer File. Save the file as Unattend.xml. 6. Create a Configuration Set (In this step, you create a configuration set that will gather all of the resource files that you specified in your answer file into one location.) A. In Windows SIM, on the Tools menu, select Create Configuration Set. B. The Create Configuration Set window opens. C. Specify a destination location where you intend to publish the configuration set D. Select a removable dirve such as a USB flash drive (UFD), and then click OK. 7. Deploying a Configuration Set Without a Network A. Turn on the new computer. B. Insert both the removable media containing your configuration set and the Windows 7 product DVD into the new computer. Note: When using a USB flash drive, insert the drive directly into the primary set of USB ports for the computer. For a desktop computer, this is typically in the back of the computer. C. Restart the computer by pressing CTRL+ALT+DEL. Note: This example assumes that the hard drive is blank. E. Windows Setup (Setup.exe) begins automatically. F. By default, Windows Setup searches all removable media for an answer file called Autounattend.xml. Autounattend.xml must be located at the root of the removable media. G. After Setup completes, validate that all customizations were applied, and then reseal the computer by using the generalize option For more information about Windows Server 2008 answer files and unattended installations, please refer to the Windows Automated Installation Kit (WAIK) User's Guide. ************************************************************ * 8G. INSTALLING THE Windows Server 2008 R2* INF FILES PRIOR * TO OS INSTALLATION ************************************************************ The simplest method for installing Windows? onto new hardware is to start directly from the Windows product DVD with an answer file called Autounattend.xml. Boot the computer with the Windows Setup media in the DVD drive and the configuration set available on an external drive. By default, Windows Setup searches all removable media for an answer file called Autounattend.xml. Autounattend.xml must be located at the root of the removable media. The answer file enables you to automate all or parts of Windows Setup Includeing adding INF files. You can create an answer file by using Windows System Image Manager (Windows SIM). Microsoft* published a Wndows Automated Installation Kit(WAIK) (Must be the Windows Server 2008 R2* version) which facilitates creation of answer files and image creation for unattended installs of Windows Server 2008 R2* with tools such as Windows SIM To create a configuration set you will need: Windows System Image Manager (Windows SIM) installed on a technician computer. An authorized copy of a Windows Vista? product DVD. Chipset device driver .inf files. Access to a network share or removable media with sufficient storage space. 1. Create a New Answer File (In this step, you define basic disk configuration and other settings that are required for an unattended installation.) A. On your technician computer, insert the Windows Server 2008 R2* product DVD into the local DVD-ROM drive. B. On the desktop of the technician computer, navigate to the \Sources directory on your DVD-ROM drive. Copy the Install.wim file from the Windows product DVD to a location on the computer. C. Open Windows SIM. On the desktop of the computer, click Start, point to Programs, point to Microsoft Windows OPK (or Windows AIK), and then click Windows System Image Manager. D. On the File menu, click Select Windows Image. E. In the Select a Windows Image dialog box, navigate to the location where you saved the Install.wim file, and then click Open. Note: A warning will appear that a .clg file does not exist. Click OK to create a .clg file. If there is more than one Windows image in the .wim file, you are prompted to select the Windows image to open. F. On the File menu, click New Answer File. 2. Create a Distribution Share (In this step, you create a distribution-share folder on your technician computer. The distribution share will store out-of-box drivers, applications, and any resource files needed for your custom installation.) A. In Windows SIM, in the Distribution Share pane, click Select a Distribution Share. B. Right-click to select Create Distribution Share. C. The Create a Distribution Share dialog box appears. D. Click New Folder, and then type a name for the folder. For example "C:\MyDistributionShareClick" E. In the Distribution Share pane, the distribution share folder opens. Windows SIM automatically creates the following folder structure. C:\MyDistributionShare\$OEM$ Folders C:\MyDistributionShare\Packages C:\MyDistributionShare\Out-of-Box 3. Add Drivers and Applications to Distribution Share A. In Windows SIM, on the Tools menu, select Explore Distribution Share. B. The Distribution Share window opens. C. Copy your device driver files (.inf) to the Out-of-Box Drivers folder. 1. Create subdirectories for each driver. For example, create directories "Chipset" and "Video" in the Out-of-Box Drivers folder. D. Close the distribution share folder. 4. Add a Device Driver to the Answer File (In this step, you add an out-of-box drivers (.inf) path to your answer file.) A. In Windows SIM, on the Insert menu, click Driver Path, and then click Pass 1 windowsPE. B. The Browse for Folder dialog box appears. C. Select the driver path to add to the answer file, and then click OK. For example, "C:\MyDistributionShare\Out-of-Box Drivers\Chipset" 5. Validate the Answer File (In this step, you validate the settings in your answer file and then save them to a file.) A. In Windows SIM, click Tools, and then click Validate Answer File. B. If the answer file validates successfully, a "success" message appears in the Messages pane; otherwise, error messages appear in the same location. C. If an error occurs, in the Messages pane, double-click the error to navigate to the incorrect setting. Change the setting to fix the error, and then revalidate the answer file. D. On the File menu, click Save Answer File. Save the file as Unattend.xml. 6. Create a Configuration Set (In this step, you create a configuration set that will gather all of the resource files that you specified in your answer file into one location.) A. In Windows SIM, on the Tools menu, select Create Configuration Set. B. The Create Configuration Set window opens. C. Specify a destination location where you intend to publish the configuration set D. Select a removable dirve such as a USB flash drive (UFD), and then click OK. 7. Deploying a Configuration Set Without a Network A. Turn on the new computer. B. Insert both the removable media containing your configuration set and the Windows Server 2008 R2* product DVD into the new computer. Note: When using a USB flash drive, insert the drive directly into the primary set of USB ports for the computer. For a desktop computer, this is typically in the back of the computer. C. Restart the computer by pressing CTRL+ALT+DEL. Note: This example assumes that the hard drive is blank. E. Windows Setup (Setup.exe) begins automatically. F. By default, Windows Setup searches all removable media for an answer file called Autounattend.xml. Autounattend.xml must be located at the root of the removable media. G. After Setup completes, validate that all customizations were applied, and then reseal the computer by using the generalize option For more information about Windows Server 2008 R2* answer files and unattended installations, please refer to the Windows Automated Installation Kit (WAIK) User's Guide. ************************************************************ * 9. INSTALLING THE INF FILES AFTER OS INSTALLATION ************************************************************ ************************************************************ * 9A. INSTALLING THE WINDOWS* 2000 INF FILES AFTER OS * INSTALLATION ************************************************************ Some Intel(R) chipset platforms already are supported by Windows* 2000, so it may not be necessary to use the INF files provided by this software to update Windows* 2000. The following steps describe the installation process of the Windows* 2000 INF files. You may need to repeat these steps to update all Intel(R) chipset devices not supported by Windows* 2000. 1. Copy the contents of the <INF Extract Directory>\XXXX\All directory to the root directory of the floppy disk (A:\). NOTE: XXXX is the directory name for the chipset of interest. Refer to Section 8 for more details. 2. Close all programs currently running on the system. 3. Click on Start. 4. Select Settings. 5. Select Control Panel. 6. Double-click on the System icon. 7. Click on the Hardware tab. 8. Click on the Device Manager button. 9. Select "Devices by connection" under the View menu. 10. Click on MPS Uniprocessor PC -OR- MPS Multiprocessor PC. NOTE: Only one of the above items will be displayed for a given system. 11. Click on PCI bus. 12. Right-click on the line containing the description PCI standard host CPU bridge -or- PCI standard ISA bridge -or- PCI standard PCI-to-PCI bridge -or- PCI System Management Bus -or- Standard Dual PCI IDE Controller -or- Standard Universal PCI to USB Host Controller (This line will be selected.) 13. Select Properties from the pull-down menu. 14. Click on the Driver tab. 15. Click on the Update Driver button. 16. Windows* 2000 will launch the Upgrade Device Driver Wizard. Select Next. 17. Ensure that the following choice is selected: Search for a suitable driver for my device (recommended) 18. Insert the floppy containing the Windows* 2000 INF files into the floppy drive. 19. Select Next. 20. Windows* 2000 will list locations from where the updated driver file can be found. Ensure that the following choice is selected: Floppy disk drives 21. Select Next. 22. Windows* 2000 should report that a driver has been found: (The detected device name will be displayed.) Select Next. 23. Select Finish. 24. Reboot the system when prompted to do so. ************************************************************ * 9B. INSTALLING THE WINDOWS* XP INF FILES AFTER OS * INSTALLATION ************************************************************ Some Intel(R) chipset platforms already are supported by Windows* XP so it may not be necessary to use the INF files provided by this software to update Windows* XP. The following steps describe the installation process of the Windows* XP INF files. You may need to repeat these steps to update all Intel(R) chipset devices not supported by Windows* XP. 1. Copy the contents of the <INF Extract Directory>\XXXX\All directory to the root directory of the floppy disk (A:\). NOTE: XXXX is the directory name for the chipset of interest. Refer to Section 8 for more details. 2. Close all programs currently running on the system. 3. Click on Start. 4. Select Settings. 5. Select the Control Panel. 6. Double-click on the System icon. 7. Click on the Hardware tab. 8. Click on the Device Manager button. 9. Select "Devices by connection" under the View menu. 10. Click on MPS Uniprocessor PC -OR- MPS Multiprocessor PC. NOTE: Only one of the above items will be displayed for a given system. 11. Click on PCI bus. 12. Right-click on the line containing the description PCI standard host CPU bridge -or- PCI standard ISA bridge -or- PCI standard PCI-to-PCI bridge -or- PCI System Management Bus -or- Standard Dual PCI IDE Controller -or- Standard Universal PCI to USB Host Controller (This line will be selected.) 13. Select Properties from the pull-down menu. 14. Click on the Driver tab. 15. Click on the Update Driver button. 16. Windows* XP will launch the Upgrade Device Driver Wizard. Select Next. 17. Ensure that the following choice is selected: Search for a suitable driver for my device (recommended) 18. Insert the floppy containing the Windows* XP INF files into the floppy drive. 19. Select Next. 20. Windows* XP will list locations from where the updated driver file can be found. Ensure that the following choice is selected: Floppy disk drives 21. Select Next. 22. Windows* XP should report that a driver has been found: (The detected device name will be displayed.) Select Next. 23. Select Finish. 24. Reboot the system when prompted to do so. ************************************************************ * 9C. INSTALLING THE WINDOWS SERVER* 2003 INF FILES AFTER * OS INSTALLATION ************************************************************ Some Intel(R) chipset platforms already are supported by Windows Server* 2003 so it may not be necessary to use the INF files provided by this software to update Windows Server* 2003. The following steps describe the installation process of the Windows* XP INF files. You may need to repeat these steps to update all Intel(R) chipset devices not supported by Windows Server* 2003. 1. Copy the contents of the <INF Extract Directory>\XXXX\All directory to the root directory of the floppy disk (A:\). NOTE: XXXX is the directory name for the chipset of interest. Refer to Section 8 for more details. 2. Close all programs currently running on the system. 3. Click on Start. 4. Select Settings. 5. Select the Control Panel. 6. Double-click on the System icon. 7. Click on the Hardware tab. 8. Click on the Device Manager button. 9. Select "Devices by connection" under the View menu. 10. Click on MPS Uniprocessor PC -OR- MPS Multiprocessor PC. NOTE: Only one of the above items will be displayed for a given system. 11. Click on PCI bus. 12. Right-click on the line containing the description PCI standard host CPU bridge -or- PCI standard ISA bridge -or- PCI standard PCI-to-PCI bridge -or- PCI System Management Bus -or- Standard Dual PCI IDE Controller -or- Standard Universal PCI to USB Host Controller (This line will be selected.) 13. Select Properties from the pull-down menu. 14. Click on the Driver tab. 15. Click on the Update Driver button. 16. Windows Server* 2003 will launch the Upgrade Device Driver Wizard. Select Next. 17. Ensure that the following choice is selected: Search for a suitable driver for my device (recommended) 18. Insert the floppy containing the Windows Server* 2003 INF files into the floppy drive. 19. Select Next. 20. Windows Server* 2003 will list locations from where the updated driver file can be found. Ensure that the following choice is selected: Floppy disk drives 21. Select Next. 22. Windows Server* 2003 should report that a driver has been found: (The detected device name will be displayed.) Select Next. 23. Select Finish. 24. Reboot the system when prompted to do so. ************************************************************ * 9D. INSTALLING THE WINDOWS VISTA INF FILES AFTER * OS INSTALLATION ************************************************************ Some Intel(R) chipset platforms already are supported by Windows Vista so it may not be necessary to use the INF files provided by this software to update Windows Vista. The following steps describe the installation process of the Windows* Vista INF files. You may need to repeat these steps to update all Intel(R) chipset devices not supported by Windows Vista. 1. Copy the contents of the <INF Extract Directory>\XXXX\All directory to the root directory of the floppy disk (A:\). NOTE: XXXX is the directory name for the chipset of interest. Refer to Section 8 for more details. 2. Close all programs currently running on the system. 3. Click on Start. 4. Select Settings. 5. Select the Control Panel. 6. Double-click on the System icon. 7. Click on the Hardware tab. 8. Click on the Device Manager button. 9. Select "Devices by connection" under the View menu. 10. Click on MPS Uniprocessor PC -OR- MPS Multiprocessor PC. NOTE: Only one of the above items will be displayed for a given system. 11. Click on PCI bus. 12. Right-click on the line containing the description PCI standard host CPU bridge -or- PCI standard ISA bridge -or- PCI standard PCI-to-PCI bridge -or- PCI System Management Bus -or- Standard Dual PCI IDE Controller -or- Standard Universal PCI to USB Host Controller (This line will be selected.) 13. Select Properties from the pull-down menu. 14. Click on the Driver tab. 15. Click on the Update Driver button. 16. Windows Vista will launch the Upgrade Device Driver Wizard. Select Browse my computer for the driver software. 17. Enter "A:\" in the Combo Box 18. Ensure that the Include Subfolders checkbox is checked 19. Select Next 20. The window Will Display the Device that was installed 21. Select Close 22. Reboot the system if prompted to do so. ************************************************************ * 9E. INSTALLING THE Windows Server* 2008 INF FILES AFTER * OS INSTALLATION ************************************************************ Some Intel(R) chipset platforms already are supported by Windows Server* 2008 so it may not be necessary to use the INF files provided by this software to update Windows Server* 2008. The following steps describe the installation process of the Windows Server* 2008 INF files. You may need to repeat these steps to update all Intel(R) chipset devices not supported by Windows Server* 2008. 1. Copy the contents of the <INF Extract Directory>\XXXX\All directory to the root directory of the floppy disk (A:\). NOTE: XXXX is the directory name for the chipset of interest. Refer to Section 8 for more details. 2. Close all programs currently running on the system. 3. Click on Start. 4. Select Settings. 5. Select the Control Panel. 6. Double-click on the System icon. 7. Click on the Hardware tab. 8. Click on the Device Manager button. 9. Select "Devices by connection" under the View menu. 10. Click on MPS Uniprocessor PC -OR- MPS Multiprocessor PC. NOTE: Only one of the above items will be displayed for a given system. 11. Click on PCI bus. 12. Right-click on the line containing the description PCI standard host CPU bridge -or- PCI standard ISA bridge -or- PCI standard PCI-to-PCI bridge -or- PCI System Management Bus -or- Standard Dual PCI IDE Controller -or- Standard Universal PCI to USB Host Controller (This line will be selected.) 13. Select Properties from the pull-down menu. 14. Click on the Driver tab. 15. Click on the Update Driver button. 16. Windows Vista will launch the Upgrade Device Driver Wizard. Select Browse my computer for the driver software. 17. Enter "A:\" in the Combo Box 18. Ensure that the Include Subfolders checkbox is checked 19. Select Next 20. The window Will Display the Device that was installed 21. Select Close 22. Reboot the system if prompted to do so. ************************************************************ * 9F. INSTALLING THE Windows 7* INF FILES AFTER * OS INSTALLATION ************************************************************ Some Intel(R) chipset platforms already are supported by Windows 7* so it may not be necessary to use the INF files provided by this software to update Windows 7*. The following steps describe the installation process of the Windows 7* INF files. You may need to repeat these steps to update all Intel(R) chipset devices not supported by Windows 7*. 1. Copy the contents of the <INF Extract Directory>\XXXX\Win7 directory to the root directory A removable media, such as a USB flash drive (UFD) or floppy disk (A:\). NOTE: XXXX is the directory name for the chipset of interest. Refer to Section 8 for more details. 2. Close all programs currently running on the system. 3. Click on Start. 4. Select Settings. 5. Select the Control Panel. 6. Double-click on the System icon. 7. Click on the Hardware tab. 8. Click on the Device Manager button. 9. Select "Devices by connection" under the View menu. 10. Click on MPS Uniprocessor PC -OR- MPS Multiprocessor PC. NOTE: Only one of the above items will be displayed for a given system. 11. Click on PCI bus. 12. Right-click on the line containing the description PCI standard host CPU bridge -or- PCI standard ISA bridge -or- PCI standard PCI-to-PCI bridge -or- PCI System Management Bus -or- Standard Dual PCI IDE Controller -or- Standard Universal PCI to USB Host Controller (This line will be selected.) 13. Select Properties from the pull-down menu. 14. Click on the Driver tab. 15. Click on the Update Driver button. 16. Windows 7* will launch the Upgrade Device Driver Wizard. Select Browse my computer for the driver software. 17. Enter "A:\" in the Combo Box 18. Ensure that the Include Subfolders checkbox is checked 19. Select Next 20. The window Will Display the Device that was installed 21. Select Close 22. Reboot the system if prompted to do so. ************************************************************ * 9G. INSTALLING THE Windows Server* 2008 R2 INF FILES AFTER * OS INSTALLATION ************************************************************ Some Intel(R) chipset platforms already are supported by Windows Server* 2008 R2 so it may not be necessary to use the INF files provided by this software to update Windows Server* 2008 R2. The following steps describe the installation process of the Windows Server* 2008 R2 INF files. You may need to repeat these steps to update all Intel(R) chipset devices not supported by Windows Server* 2008 R2. 1. Copy the contents of the <INF Extract Directory>\XXXX\Win7 directory to the root directory A removable media, such as a USB flash drive (UFD) or floppy disk (A:\). NOTE: XXXX is the directory name for the chipset of interest. Refer to Section 8 for more details. 2. Close all programs currently running on the system. 3. Click on Start. 4. Select Settings. 5. Select the Control Panel. 6. Double-click on the System icon. 7. Click on the Hardware tab. 8. Click on the Device Manager button. 9. Select "Devices by connection" under the View menu. 10. Click on MPS Uniprocessor PC -OR- MPS Multiprocessor PC. NOTE: Only one of the above items will be displayed for a given system. 11. Click on PCI bus. 12. Right-click on the line containing the description PCI standard host CPU bridge -or- PCI standard ISA bridge -or- PCI standard PCI-to-PCI bridge -or- PCI System Management Bus -or- Standard Dual PCI IDE Controller -or- Standard Universal PCI to USB Host Controller (This line will be selected.) 13. Select Properties from the pull-down menu. 14. Click on the Driver tab. 15. Click on the Update Driver button. 16. Windows Server* 2008 R2 will launch the Upgrade Device Driver Wizard. Select Browse my computer for the driver software. 17. Enter "A:\" in the Combo Box 18. Ensure that the Include Subfolders checkbox is checked 19. Select Next 20. The window Will Display the Device that was installed 21. Select Close 22. Reboot the system if prompted to do so. ************************************************************ * 10. IDENTIFYING THE SOFTWARE VERSION NUMBER ************************************************************ The version numbers displayed by Device Manager for a given device may not be the same as the Intel(R) Chipset Device Software version. The correct version number is shown at the top of this file. ************************************************************ * 11. TROUBLESHOOTING ************************************************************ It is assumed that the system requirements in Section 2 above have been satisfied. Issue: USB devices no longer work correctly after you install the Intel Chipset Software Installation Utility in Windows XP or in Windows Server 2003. Solution: A recommended fix has been provided by Microsoft in Knowledge Base article(921411). For additional information, please refer to the KB article located at [url="http://support.microsoft.com/kb/921411/en-us"]USB devices no longer work correctly after you install the Intel Chipset Software Installation Utility in Windows XP or in Windows Server 2003[/url] Please use the following installation procedures: - Windows XP or Windows Server 2003 installed - QFE (921411) installed - Latest Intel(R) Chipset Device Software Issue: At the end of executing the Chipset Device Software, the USB keyboard and mouse will stop functioning. This problem only occurs when using Windows XP with SP1 or Windows 2000 Server with SP4 on a system configured with a USB keyboard and/or mouse. This condition is temporary until a system reset. Solution: A recommended fix has been provided by Microsoft in Knowledge Base article(822603). For additional information, please refer to the KB article located at [url]http://support.microsoft.com/default.aspx?scid=kb;[/url][LN];822603 Please use the following installation procedures: - Windows XP installed with SP1 - QFE (822603) installed - Latest Chipset Utility Software installed. Issue: System locks up during Device Manager Remove or during restart. Solution: System lockup can occur during reboot as a result of several possible system issues. In the event of system lockup, reboot the machine and view Device Manager. If devices are listed properly and the system experiences no further problems, then the .INF file restore process was successful. If devices are not configured correctly, try re-running the procedures outlined in Section 3. If this does not fix the issue or further issues are experienced, reinstall the operating system. Issue: After running the setup program and rebooting the machine, Windows reports that it cannot find one of the following files: ESDI_506.pdr Solution: Click Browse in the dialog box where this issue occurs, locate the <Windows>\System\IOSubsys directory. Click OK. The system should be able to locate this file in this directory and continue re-enumerating for the new devices. Issue: After running the setup program and rebooting the machine, Windows reports that it cannot find one of the following files: UHCD.SYS USBD.SYS USBHUB.SYS Solution: Click Browse in the dialog box where this issue occurs and locate the following directory: <Winnt>\System32\drivers Click OK. The system should be able to locate the files in this directory and continue re-enumerating for the new devices. Issue: After running the setup program and rebooting the machine, Windows reports that it cannot find the following file: ISAPNP.VXD Solution: Click Browse in the dialog box where this issue occurs and locate the <Winnt>\System directory. Click OK. The system should be able to locate this file in this directory and continue re-enumerating for the new devices. Issue: After performing the silent install, the HKLM\Software\Intel\InfInst key was not created or the data of the value "install" is not "success". Solution: This is caused by one of the following scenarios: - The current system does not contain a supported operating system, or -or- - The current system does not contain a supported chipset. Verify that the System Requirements are met as outlined in Section 2. ************************************************************ * DISCLAIMER ************************************************************ Intel is making no claims of usability, efficacy or warranty. The Intel(R) SOFTWARE LICENSE AGREEMENT (OEM / IHV / ISV Distribution & Single User) completely defines the licensed use of this software. ************************************************************ Information in this document is provided in connection with Intel(R) products. No license, express or implied, by estoppel or otherwise, to any intellectual property rights is granted by this document. Intel assumes no liability whatsoever, and Intel disclaims any express or implied warranty relating to sale and/or use of Intel(R) products, including liability or warranties relating to fitness for a particular purpose, merchantability or infringement of any patent, copyright or other intellectual property right. Intel(R) products are not intended for use in medical, life saving, or life-sustaining applications. ************************************************************ Intel Corporation disclaims all warranties and liabilities for the use of this document and the information contained herein, and assumes no responsibility for any errors which may appear in this document, nor does Intel make a commitment to update the information contained herein. Intel reserves the right to make changes to this document at any time, without notice. ************************************************************ ************************************************************ * Intel is a trademark or registered trademark of Intel Corporation or its subsidiaries in the United States and other countries. * Other brands and names are the property of their respective owners. Copyright (c) Intel Corporation, 1997-2010 -
ik heb een i7 920 , al mijn spellen hebben super veel Fps. de graphische kaart dient om de grafische kwaliteit, zoals de resolutie en vloeiende lijnen , niet in haaietanden. dus je nieuwe gpu zal je spellen mischien in grafische kwaliteit verbeteren maar de Fps misschien een heel klein beetje , ati 4850 heeft 256bit en pixelshader 4.1 en 5.0 ready en dx11 en draait 500mhz normaal en 625mhz als je spelletjes speelt. dus je nieuwe gpu heeft ook 256 bit en is 5.0 pixelshader en is ook dx11 en 810Mhz en 128.3 GB/s. dus van 625 naar 810 is 29.6 procent sneller en van 63 naar 128 is hoeveel hij aan kan in hoge resoluties( bandbreedte). dus zoals ik toonde in die foto , die brug is je bandbreete van je pci e 1 slot. zoals ik zij begin met die voeding .
-
euh ddr3 ik denk dat je processor zal klagen en je moeder bord .
de ati 4850 is wel een zeer goede gpu. nutuurlijk zijn er betere, maar 63Gb s is toch ok.
de voeding , daar zou ik eerst mee beginnen , dat alles genoeg eletriek krijgt kan al een groot verschil zijn en paar ferme koelers of waterkoeling.
-
-
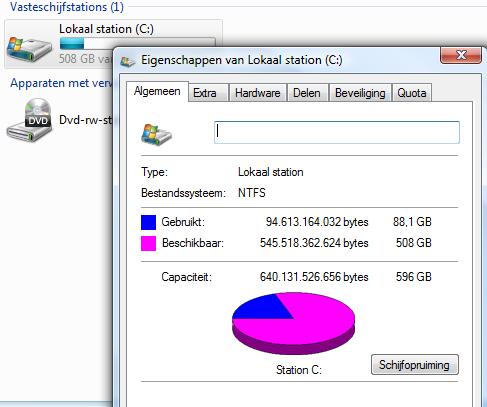
ik heb vista zelf geinstaleerd en het formateren ging lijk in een flits.
nu vista is voledig up to date 88.1 gig maar nu zie ik dat mijn c: geen naam heeft.
wat gebeurt er als ik daar een naam invul?


hdd stuk of niet
in Archief Hardware algemeen
Geplaatst:
danku zeer , met ccleaner heb ik heel veel herstelpunten gevonden en heb ze verwijdert . heb de laatste 3 niet verwijdert en hola hola , ja het is opgelost , dus met die spacesniffer vond ik een optie toon unknown space en 298 gb was unaccisable , nu na het verwijderen van die punten hola hola heb -+260GB gewonnen . joepie danku .
ik heb vista , die heeft gen zo een slider maar ik kan da wel in CMD met een code toewijzen zie ik . maar toch danku voor mij op het juiste spoor te brengen 1000x merci